Tips on planning, documenting, and testing a SWI-Prolog project
SWI-Prolog's manual has a chapter Initialising and Managing a Prolog Project providing tips on filenames and directories. It aims to be Prolog dialect neutral, so does not combine this with PlDoc and PlUnit, which I'll attempt to do here.
I've structures these notes along the lines of a six step recipe suggested by a freely available online textbook How To Design Progams. Though its examples are written in an open source version of Lisp, Racket, the ideas it teaches drawn from test-driven development, design by contract, data-driven design etc are programing language agnostic.
Systematic design methodologies tend to provoke a lot of religious arguments. Detractors seem to miss the point that they are aimed at keeping big projects on track. The small example I'm using here — borrowed from How to Design Programs which converts Fahrenheit to Celsius — make this look like a lot of unecessary overhead. But using a properly big example requiring a systematic design approach would turn this into a book.
Step 1: Design top-down, build bottom-up
After creating a directory in which you intend developing your project, my suggestion is to kick off with a file called README.md which PLDoc will automatically load and use as your home page after you type this at the swipl prompt:
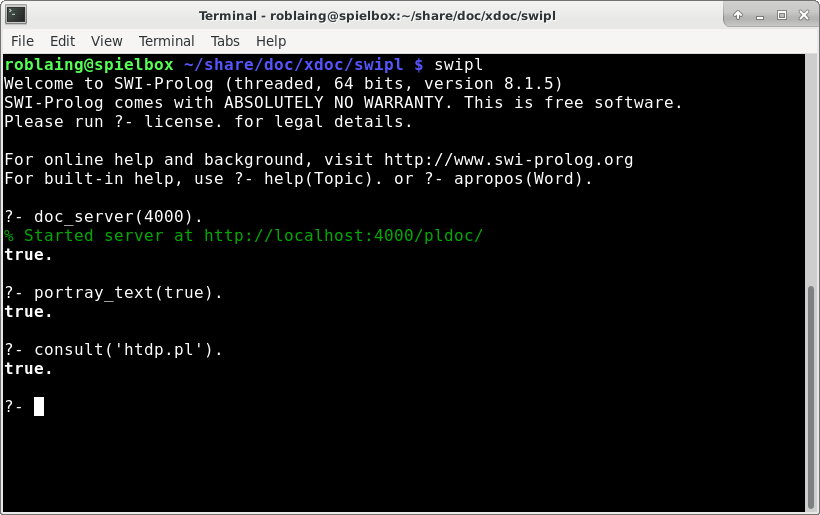
doc_server(4000).
portray_text(true).
To make PlDoc aware of my small module htdp.pl (which I'll explain over the course of this tutorial) I enter
consult('htdp.pl').
and my terminal looks like this:
Now if I point my browser to http://localhost:4000/pldoc/ I'll see something like this:
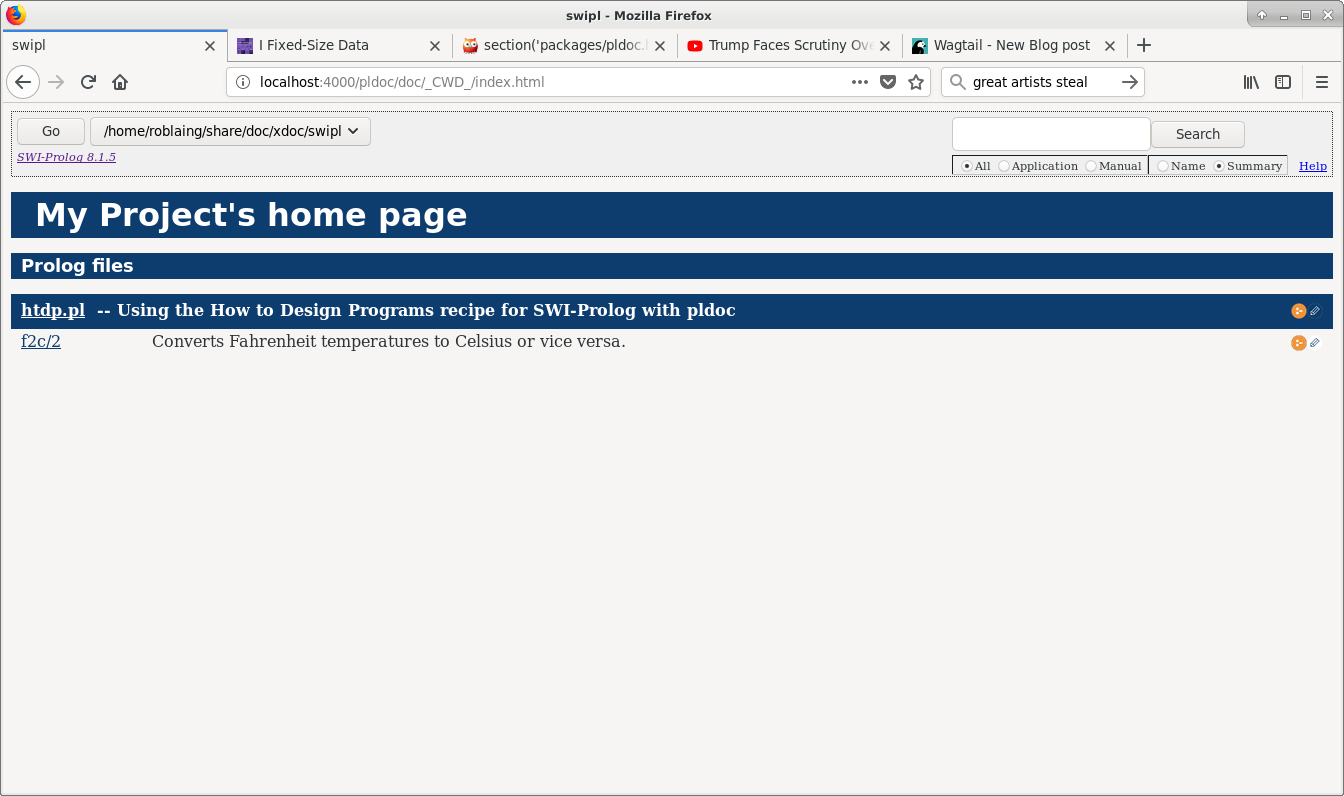
At this stage my README.md file only consists of the line
# My Project's home page
PlDoc lets you use either Markdown or TWiki. It allows you to mix them, but I suggest using the *.md suffix and sticking to Markdown so that the README.md file could be uploaded to github or processed by Doxygen.
Any packages in the current directory (you can change directories using a menu in the top left corner and then click a "Go" button) that PlDoc has been made aware of by consult/1 or use_module/2 will be listed at the bottom of the page under the Prolog files heading.
Provided these files have been commented correctly (what this tutorial is about), each module will have its own section on the home page with a list of its public predicates along with summaries of what they do.
For instance, clicking on the htdp.pl link brings up:
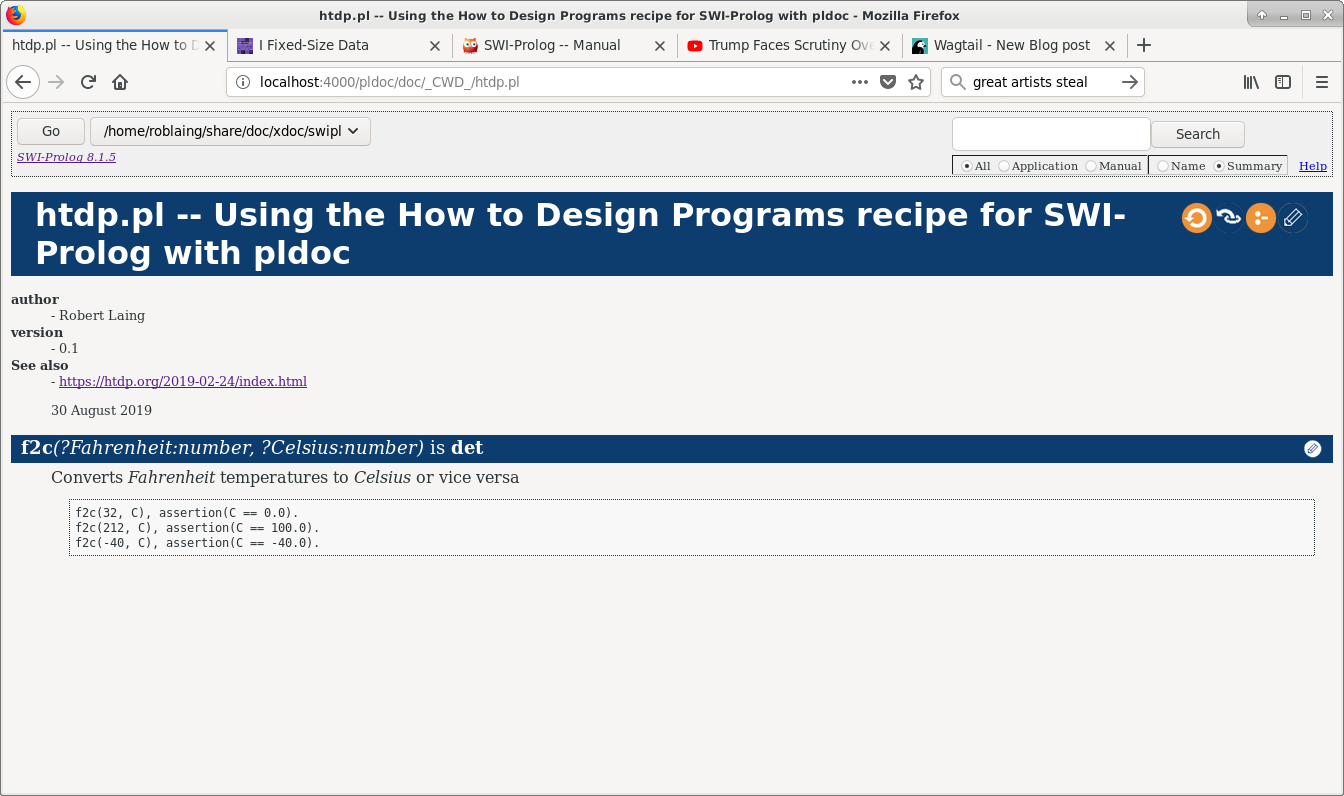
If I only wanted the documentation for the f2c/2 predicate and not the whole module, I could get it by clicking on that instead of the module name.
Besides being able to navigate to each individual module's documentation page, or that of any individual predicate it contains, the web page generated by PlDoc has an icon on the right hand side to let you look at the source code, and another to let you edit the code by launching PceEmacs with the selected file loaded.
To see changes to the files, I just need to refresh the browser.
Back to the first stage of the design process: planning. Snoopy's travails getting past the intro of the novel he is writing, a theme Charles Schulz often explored in his Peanuts cartoons, will strike a chord in anyone who has started any kind of creative project.

Rather than starting at the beginning as a reader would, the great novelist should be using a "top-down design" approach, starting with a summary of the overarching plot, then splitting that into chapters with what we'll call a one-line purpose statement for each, only getting into nitty-gritty details such as character names and the intro after a blueprint has been drawn and the virtual scaffolding is in place.
"The design of a program proceeds in a top-down planning phase followed by a bottom-up construction phase. We explicitly show how the interface to libraries dictates the shape of certain program elements. In particular, the very first phase of a program design yields a wish list of functions," How to Design Programs says in its preface.
But as another Snoopy cartoon illustrates, blindly following a recipe doesn't necessarily improve things.

Moving from the analogy of writing novels to writing software applications, once we have broadly decided what we want to achieve — in my case a strategy game playing website newsgames.biz — the SWI-Prolog equivalent of chapters is modules, which in SWI-Prolog's case have interfaces which look like:
:-module(module_name,
    [ predicate1/arity1
    , predicate2/arity2
    , ...
    ]
).
Writing this list of interfaces produces what How to Design Programs calls a wish list.
The section on modules in the SWI-Prolog suggests a few of the advantages of interfaces. In terms of systematically designing software, a huge advantage of modularisation is it splits what at first appears to be an overwhelming task into manageable pieces and provides a todo list of how to proceed.
An advantage software developers have over novelists is well designed modules can be re-used in lots of projects. Better yet, we often find the "chapter" we are looking for has already been written by somebody else, and using open source software is not considered plagiarism.
A simple example of a commented module file
:- module(htdp, [f2c/2]).

/**  Using the How to Design Programs recipe for SWI-Prolog with pldoc
* @author Robert Laing
* @version 0.1
* @see
*
* 30 August 2019
*/

/**
* f2c(+Fahrenheit:number, -Celsius:number) is det
*
* Converts Fahrenheit temperatures to Celsius or vice versa
*
* ~~~{.pl}
* f2c(32, C), assertion(C == 0.0).
* f2c(212, C), assertion(C == 100.0).
* f2c(-40, C), assertion(C == -40.0).
* ~~~
*/
f2c(Fahrenheit, Celsius) :-
    Celsius is ((5/9) * (Fahrenheit - 32)).
PlDoc uses notation similar to Javadoc with comments starting with /** and ending with */, containing @tag commands which are used to format the HTML.
Note that the file comment needs to come after the module/2 declaration, else PlDoc won't render it correctly.
The Javadoc style is an alternative to a more Prologish percent sign comment notation. I hop between SWI-Prolog and Javascript, whose jsdoc system also uses notation derived from Javadoc, so find it more convenient.
Saving the percent sign for comments which are just comments, and not supposed to be part of the automatically generated documentation, is also handy.
Step 2: Fake it till you make it
How To Design Progams describes this second step as "Signature, Purpose Statement, Header".
The textbook's initial example, which I've translated into Prolog for this tutorial, looks like this:
; Number -> Number
; converts Fahrenheit temperatures to Celsius
; given 32, expect 0
; given 212, expect 100
; given -40, expect -40
(define (f2c f)
    (* 5/9 (- f 32)))
The above style of signature `Number -> Number` reminds me of ML, a language I was introduced to by an excellent online course which stresses types and interfaces by not simply leaving signatures as something to be commented, but verbosely writes them out in Type1 * Type2 * ... -> TypeR notation when running scripts.
This convention does not really work for Prolog considering predicates have one or more output parameters as opposed to functions which have a return value.
Prolog signatures (declaration headers)
PlDoc's documentation has a section Type, mode and determinism declaration headers which sets out important conventions required to understand Prolog's often terse documentation. In this example, the Prolog-style declaration header would look like this:
f2c(+Fahrenheit:number, -Celsius:number) is det
Sadly, there's a lot in the above line to frustrate and confuse novices encountering Prolog for the first time who have not yet learned that these are documentation conventions, not actual coding syntax. What the prefix symbols along with det, semidet, failure, nondet, and multi mean are core concepts which should be upfront in a Prolog beginner tutorial, not burried in PlDoc's documenation.
Without comments explaining what arguments represent, languages which do not require hard typing give few clues on how to use the provided code, even moreso languages where the convention is to use the shorthand of functor/arity.
I'm a bit vague as to how polymorphic arguments should be documented in Prolog. As far as I understand the example provided in the documentation
%! length(+List:list, -Length:int) is det.
%! length(?List:list, -Length:int) is nondet.
%! length(?List:list, +Length:int) is det.
%
% True if List is a list of length Length.
%
% @compat iso
a separate declaration header is written for each case.
If I wanted to change this simple example to be bidirectional — a nice thing about Prolog is it encourages symmetry — my guess would be to change the declaration header to:
f2c(?Fahrenheit:number, ?Celsius:number) is semidet
To implement this (which I shouldn't be doing at this stage), I'd need to split this into three predicates;
f2c(+Fahrenheit:number, -Celsius:number) is det % Returns one Celsius value for provided Fahrenheit value
f2c(-Fahrenheit:number, +Celsius:number) is det % Returns one Fahrenheit value for provided Celsius value
f2c(+Fahrenheit:number, +Celsius:number) is semidet % Fails if input values have not been correctly calculated
My view is that overcomplicates the documentation for users who just need to know they can input either value, or both if they want to test a pre-calculated conversion.
Purpose statements
This is a short summary the PlDoc server will place next to the link to the predicate on the home page.
Note there is a blank comment line between the declaration header and the purpose statement.
In this case, it is rendered on the home page as:
f2c/2 Converts Fahrenheit temperatures to Celsius.
Stubs
The f2c example jumps the gun in that the predicate has already been completed. In a large project following a systematic design methodology, only something like
f2c(Fahrenheit, 0.0).
would be written as a placeholder at this stage to avoid a ERROR: Undefined procedure: f2c/2 (DWIM could not correct goal) as we build up our wish list with tests.
Loading the module file with the example stub would result in a red Warning: Singleton variables: [Fahrenheit], acting as a handy reminder this is a temporary placeholder.
Step 3: Illustrate with examples
The first thing most people look for in software documentation is examples of how to use an unfamiliar function. So one of the many advantages of example-driven design is it leaves good documentation in its wake.
Much as lawyers are trained to only ask witnesses questions they already know the answers to, the quality of code improves a lot if developers start by listing examples of what the correct output is for given input. This not only makes debugging easier later, it also shapes the developing code in a logical way.
Combining examples as documentation and tests with SWI-Prolog requires a bit of duplication since PlUnit and PlDoc are not integrated. An example of an integrated documentation and unit testing system would by Python's pydoc, but it doesn't make that much difference provided you remember to include some illustrative examples in your documentation.
Repeating how I've written my documentation for f2c again:
/**
* f2c(+Fahrenheit:number, -Celsius:number) is det
*
* Converts Fahrenheit temperatures to Celsius
*
* ~~~{.pl}
* f2c(32, C), assertion(C == 0.0).
* f2c(212, C), assertion(C == 100.0).
* f2c(-40, C), assertion(C == -40.0).
* ~~~
*/
A Google search revealed that Assertions As Comments as actually not uncommon.
Running these assertions is done in a separate file, which I've called htdp.plt and looks like this:
:- begin_tests(htdp).
:- use_module(['htdp.pl']).

test(f2c2) :-
    f2c(32, C),
    assertion(C == 0.0).

test(f2c1) :-
    f2c(212, C),
    assertion(C == 100.0).

test(f2c3) :-
    f2c(-40, C),
    assertion(C == -40.0).

:- end_tests(htdp).
If I use the stub f2c(Fahrenheit, 0.0). in the module file rather than the completed predicate, I'd get the following test results:
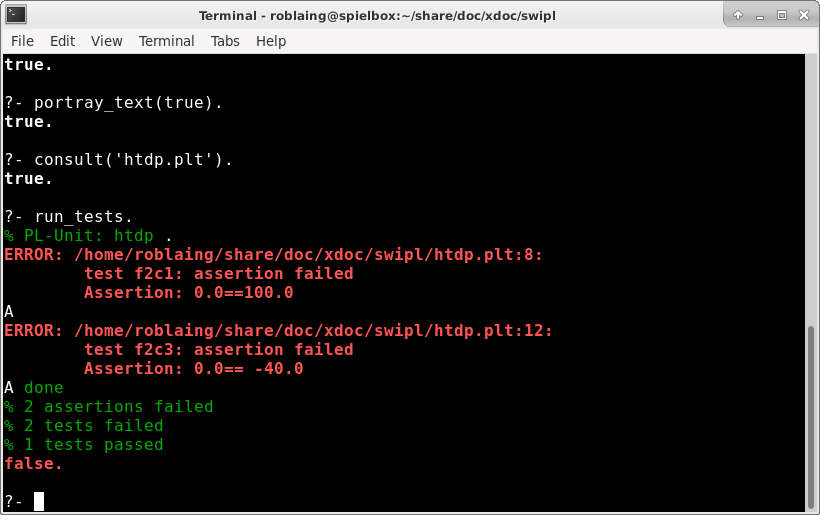
Ideally, the % 2 tests failed line should be in red rather than green, but at least the error messages are red.
Test driven development is a form of gamification in that the red, green, refactor cycle turns getting the stub to work correctly into a fun challenge, eventually rewarded the player with an all green screen saying all tests past.
Step 4: Expand stubs into skeletons or templates
Googling data-driven development tends to bring up topics related to developing first-person shooter games with C++, which I think unfortunate since it obscures an important concept that programs "are what they eat", and those that consume and produce the same types will be abstractly very similar.
A nifty trick I found doing the ML course was that given the input and output types for a given problem, simply finding a builtin function with the same signature and then using its code as a starting point made the homework assignments fairly easy. Though I've never done any university courses involving Prolog homework assignments, I'm pretty sure the same trick would work.
Here Prolog's listing/1 predicate is invaluable. I was recently struggling with a data munging problem and managed to get going by using listing(read_files_to_codes). which provided this template to edit into what I wanted to do (and introduced me to setup_call_cleanup/3):
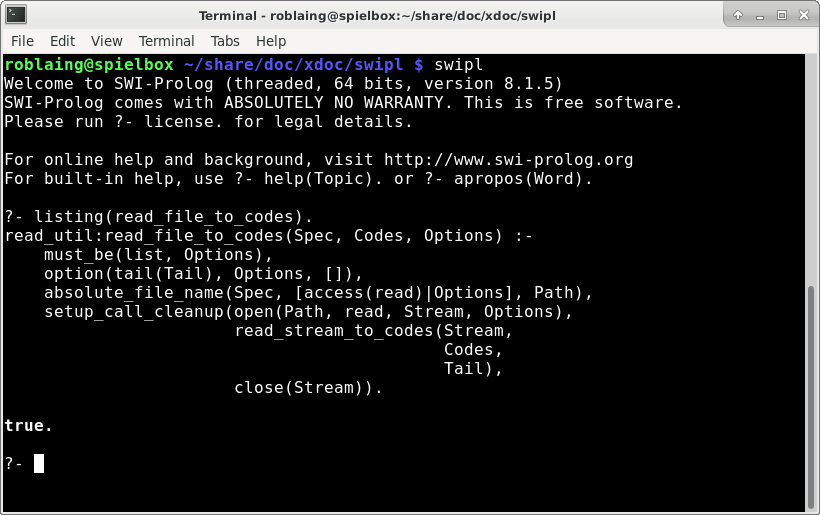
"Big picture" predicates early in the design phase tend to involve a pipeline of data translations, which in turn involves expanding their stubs into wish lists of auxiliary or helper predicates, making this a fractal process involving lots of repeating the design steps on a smaller scale as you drill down.
Step 5: Flesh out the skeletons
I'm simply going to cut and paste from How to Design Programs here: "It is now time to code. In general, to code means to program, though often in the narrowest possible way, namely, to write executable expressions and function definitions.
"To us, coding means to replace the body of the function with an expression that attempts to compute from the pieces in the template what the purpose statement promises."
Step 6: Turn all the red green
For this simple example, it's game won when we get to a screen that looks like this:
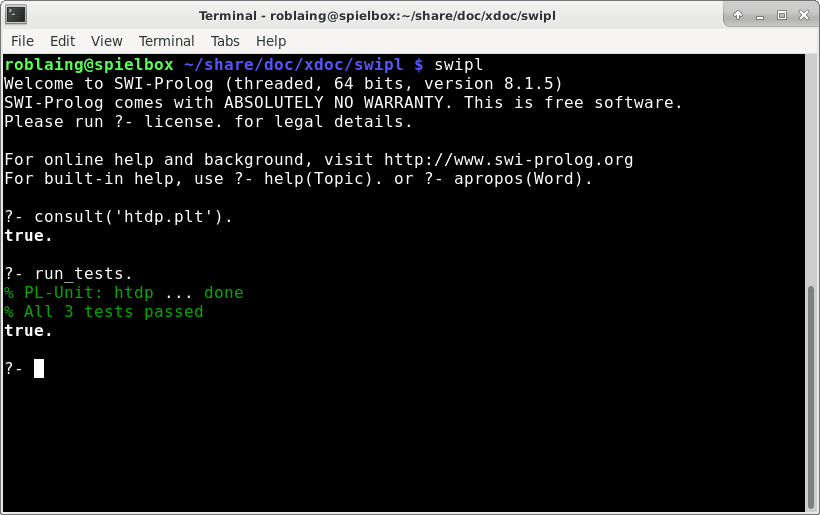
For a real-world big application, the red, green, refactor cycle would probably never end, with ever more features added and new bugs creeping in.